Main Deacom Application & Services
The Deacom Setup Wizard will install, or modify, base Deacom, and the appropriate services (Web service, IIS adapter, and Automation service).
Multiple system updates are also now possible if they reside under the same root directory.
- If running using the packaged installer, a new install or update will be initiated.
- If running the installer from the installed Deacom directory, a modify will be initiated.
Notes:
- When installing any of the services, a folder named "Services" will be created in the root folder of Deacom. Subfolders for each service installed will also be created (Webservice, Automationservice, or IIS)
- A confirmation screen will de displayed listing the services and systems (environments) installed or modified.
- The IIS app pool/adapter, Web service, and Automation service will be stopped and then restarted automatically during or after an update.
Setup Process
Service options and SQL setup
The fields presented on the Deacom Setup screen depend on which options/services are being installed or modified. The screen below represents all fields when all options are installed/modified.
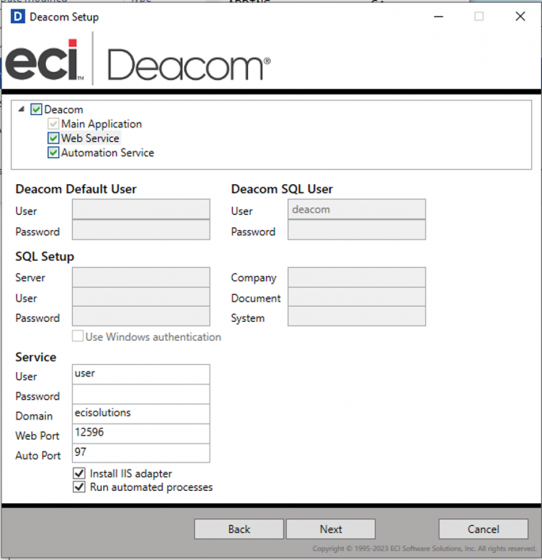
Deacom Default User
Companies must create their own (note: startup startup cannot be used). Deacom Default User is prompted to change password on first login and is created with the same securities as startup startup.
|
Field |
Description |
|---|---|
|
User |
Default username required to access the selected Deacom system. |
|
Password |
Default password required to access the selected Deacom system. |
Deacom SQL User
This identifies the required 'Deacom' user/profile for the SQL databases. Enter the password you want to use when creating this user. If this user already exists, please use that password.
|
Field |
Description |
|---|---|
|
User |
Read only - 'Deacom' |
|
Password |
Enter the correct password for the 'Deacom' SQL username. |
SQL Setup
|
Field |
Description |
|---|---|
|
Field |
If Deacom will use the default instance of SQL Server, enter the Windows server name. If Deacom will use a named instance, enter the Windows server name followed by a backslash, followed by the instance name (e.g. server2\instance3). |
|
User |
The admin username for SQL. |
|
Password |
The admin password for SQL. |
|
Company |
The recommended company database name is the name of the company, e.g. ABCSupply. The company database contains the tables that store transactional data such as Sales Orders, Purchase Orders, Production Jobs, Formulas, plant/Facility information, and General Ledger entries. |
|
Document |
The recommended company database name is the name of the company, e.g. ABCSupply. The company database contains the tables that store transactional data such as Sales Orders, Purchase Orders, Production Jobs, Formulas, plant/Facility information, and General Ledger entries. |
|
System |
The recommended system database name is "CompanySystem" where “Company” is the company name, e.g. ABCSupplySystem. The system database contains tables that store system information and parameters, such as the Deacom version and a list of all active/inactive users. |
|
Use Windows Authentication |
Optional. In Windows authentication, the assumption is the user is authenticated within Active Directory. SQL Server authenticates users through the Windows principal token in the OS. With that, SQL Server does not ask for a password for identity validation. Therefore, Windows confirms users’ identities for authentication. |
Service
|
Field |
Description |
|---|---|
|
User |
Indicates the user as which you would like this Deacom Web Service instance to run. This user needs permissions to read/write to the installation folder and to read/write to the Deacom folder. |
|
Password |
Enter appropriate password. |
|
Domain |
The windows domain (DNS) where the service will be installed (e.g. "ABCCompanyHQ"). If the company is not using a domain environment, put server name, i.e. the name of the computer that the web services will run on during installation. |
|
Web Port |
Defines the initial default port number for the Deacom Web Services, which may be changed during the Web Services installation process.
|
|
Auto Port |
Defines the port number for the Deacom Automation Console. |
|
Cloud Port |
Identifies the unique cloud local port when doing a fresh install. The port will default to 1091 but can be changed, and the port number will be written to the Deacom.ini file.
|
|
Install IIS adapter |
Optional. The IIS Adapter option offers the ability to have the Deacom services listen through IIS as well as the specified port. This option is useful in environments where IIS is already configured and serving other web traffic.
|
|
Run automated processes |
Checked by default. Supports the ability to run automated processes that are run on a timer, such as auto logout, automatic exports, stability test movements, scheduled data imports and scheduled externals. |
Install Directory/License File
When installing/updating Deacom systems users will be promoted to enter the "Install Directory" and "License File"
|
Field |
Description |
|---|---|
|
Install Directory |
Indicates the install path. The ellipse button may be used to select this path. |
|
License |
File The license key file provided by Deacom. |
Environments Upgrades/Modifications
If the root Deacom directory contains multiple systems, or environments, users will be presented with a checklist of the Deacom environments as well as an "Update Directory" field. Users may select the systems to update (these will appear once they have been updated or installed using the new setup file). You can also manually select a directory to update. If the manually selected path contains a system, it will update that system. Otherwise, it will look one sub directory deep for systems and update those.
|
Field |
Description |
|---|---|
|
Shrink Log File |
|
|
Re-Index Database |
If checked, the program will re-index all indexes that has greater than x% fragmentation |
|
Start web service |
If checked, the setup wizard we restart the web service at the end of installing/updating. |
|
Start automation service |
If checked, the setup wizard we restart the automation service at the end of installing/updating. |
Uninstalling Multiple Deacom Environments
Deacom may be installed via the standard Windows Add/Remove programs process. Once Deacom is selected from the list and uninstall is initiated, the program will uninstall all listed environments (if anything is left running, the uninstaller will attempt to close those services and remove them as well)
FAQ & Advanced Details
Managed Service Accounts (gMSA Accounts) - Users are able to use gMSA accounts to install the web services and they should be displayed in services list. An example of the steps involved are listed below:
*You must be logged in as an administrator on the server*
- Using the setup wizard, being a new installation.
- Select install path and license key.
- Fill in all info and select web service and automation service from the list.
- Use a gMSA account for Service install information.
- Install.
- After install is completed, go check the Windows services.
- Verify that the Deacom Automation Service and Deacom Web Service have the log on using the gMSA account.